Sunday, March 10, 2024
Today was a beautiful sunny day with a temperature of 55 degrees as we left Wilderness Lakes Thousand Trails in Menifee, California at 10:10 a.m.

We were heading to the Mojave Desert, so we were sure to get into warmer temperatures along the way (reaching 75 degrees in the afternoon). The Mojave Desert is a desert in the rain shadow of the southern Sierra Nevada mountains and Transverse Ranges in the Southwestern United States. Named for the indigenous Mohave people, it is located primarily in southeastern California and southwestern Nevada, with small portions extending into Arizona and Utah.
The Mojave Desert, together with the Sonoran, Chihuahuan, and Great Basin deserts, form a larger North American Desert. Of these, the Mojave is the smallest and driest. It displays typical basin and range topography, generally having a pattern of a series of parallel mountain ranges and valleys. It is also the site of Death Valley, which is the lowest elevation in North America. The Mojave Desert is often called the "high desert," as most of it lies between 2,000 and 4,000 feet. It supports a diversity of flora and fauna.

Along the way, we got one last glimpse of Big Bear covered in snow.


We passed by the Soboba Indian Reservation. The Soboba Band of Luiseño Indians is a federally recognized tribe of Luiseño people, headquartered in Riverside County, California. On June 18, 1883, the Soboba Reservation was established by the United States government in San Jacinto. There are five other federally recognized tribes of Luiseño people in southern California.

On our way to Palm Desert, California we drove up through the San Jacinto and Santa Rosa mountain ranges.


The San Jacinto and Santa Rosa mountain ranges were covered with snow.


We drove by the city of Beaumont, California (that we had been at earlier).

And we continued on our way to Palm Springs (which is now 28 miles away).

There is not much farm land here in the desert -- unless you want to count the wind farms as they are everywhere.


We are now approaching Palm Springs, California. Palm Springs is a desert resort city in Riverside County, California within the Colorado Desert's Coachella Valley. The city covers approximately 94 square miles, making it the largest city in Riverside County by land area. With multiple plots in a checkerboard pattern, more than 10% of the city is part of the Agua Caliente Band of Cahuilla Indians reservation land and is the administrative capital of the most populated reservation in California.

We drove by the Agua Caliente Indian Reservation near Palm Springs, which is a federally recognized tribe of the Cahuilla, located in Riverside County, California.

The population of Palm Springs is 44,575, but because Palm Springs is a retirement location and a winter snowbird destination, the city's population triples between November and March. It has an elevation of 479 feet.
The first humans to settle in the area were the Cahuilla people, who arrived 2,000 years ago. Cahuilla Indians lived here in isolation from other cultures for hundreds of years prior to European contact. They spoke Ivilyuat, which is a Uto-Aztecan language.
The Cahuilla Indians had several permanent settlements in the canyons of Palm Springs due to the abundance of water and shade. Various hot springs were used during wintertime. The Cahuilla hunted rabbit, mountain goat, and quail while trapping fish in nearby lakes and rivers. While men were responsible for hunting, women were responsible for collecting berries, acorns, and seeds. They also made tortillas from mesquite seeds. While the Cahuillas often spent the summers in Indian Canyons, the current site of the former Spa Resort Casino, in downtown, was often used during winter due to its natural hot springs.

We drove by many more wind turbine farms along the interstate. Today, the area is home to one of the largest wind turbine farms in the United States, with over 3,000 turbines generating clean, renewable energy. The Palm Springs windmills have become an iconic symbol of the region, attracting tourists and photographers alike.


We're now in the city limits of Palm Springs, California.


We continued on to Palm Desert, California (which is 7 miles away).


We took the Cook Street Exit 134.


And soon we could see the Palm Springs Thousand Trails on our left.


We turned left into the campground and proceeded to get checked in. We arrived at 11:45 a.m.


We got set up on site #295 for 14 nights. It's a nice sight a little ways back from the highway -- however we still heard the sounds of the traffic, airplanes overhead and the trains that rolled by right beside the highway.


We had a beautiful view from our campsite toward the mountains (see below).


We then drove into Carl's Jr. for lunch. Afterwards, we stopped at the Desert Beer Company in Palm Desert, California so Mel could enjoy a few craft beers.


Shown above is some of the craft beers they offer.


Shown below is Mel enjoying a craft beer.

Afterwards, we drove back to the campground and waited for sunset.

And we were not disappointed. So beautiful!

The Palm Springs Thousand Trails had a wonderfully filled activity sheet in which I took part (see below).

Monday, March 11, 2024
Today was another beautiful sunny day with a temperature of 50 degrees in the morning reaching 79 degrees in the afternoon. Mel played pickleball while I rode my bike around the campground.

I rode about 6 miles in 52 minutes (see screenshots above and below).


Above is another view of the snow covered mountain from the campground, while below is a neat set-up for someone that wants to tent camp.

I also caught another glimpse of the mountains while riding my bike.


Shown above are some of the craft activities to be held at the campground, while below is the entertainment St. Patrick's Day.

They are also planning to have a food truck on St. Patrick's Day and we plan to eat that before the evening entertainment (see below).

Shown below is the flyer on the "Sip & Paint" activity to be held on Thursday, March 21.

Tuesday, March 12, 2024
Another beautiful day in Palm Desert, California.

I went for 4-1/2 mile, 33 minute bike ride around the campground (see screenshots below).


Today was once again sunny with a temperature of 50 degrees in the morning that would reach 80 degrees in the afternoon. We did have what Mel and I called the twin winds -- dusty and gusty. These conditions continued for most of the day. And since it was so windy, I didn't ride my bike.
I did go up and take part in the kid's shamrock suncatcher craft that was made using the provided shamrock template, small squares of tissue paper and contact paper (no glue in this project)! So easy, that even very young children can make this "stained glass" shamrock craft. The end result is a fantastic homemade St. Patrick's Day craft.

The shamrock template is shown above, while the shamrock suncatcher made by the teacher is shown below.

Here's how to make your own Shamrock Suncatcher:
You will need the following supplies -- a black magic marker, blue painter's tape, scissors, clear contact paper, the printed shamrock template, and green and yellow tissue paper in several shades to provide a nice effect.
First, print a shamrock template. Then lay a piece of contact paper sticky side up on top of the template and secure with blue painter's tape on all corners. Then take a black magic marker and make a thick black line tracing all around the shamrock template to form the black edge of the shamrock.
Next, cut strips of the green and yellow tissue paper that are 1" wide. Then cut the strips into 1" squares. Place the squares of tissue paper onto the contact paper so that they overlap. Lastly, place a second piece of contact paper over the finished project and trim the edges off. Hang on the window and enjoy.

Shown above is the shamrock suncatcher I made.
Thursday, March 14, 2024
Today we ran errands in the morning. Once again, it was sunny starting out at a temperature of 52 degrees that reached 75 degrees in the afternoon.


We went to the Agua Caliente gas station in Rancho Mirage, California (it had the best price for gas at $4.15/gallon). We then went to Aldi in Palm Desert, California to get some groceries.


An then because the "In 'N Out Burgers" was right in the same parking area as Aldi, we decided to walk in and get something to eat for lunch.

We each had a double-double combo (sandwich and fries).

Our final stop for the day was at Walmart to get some groceries.
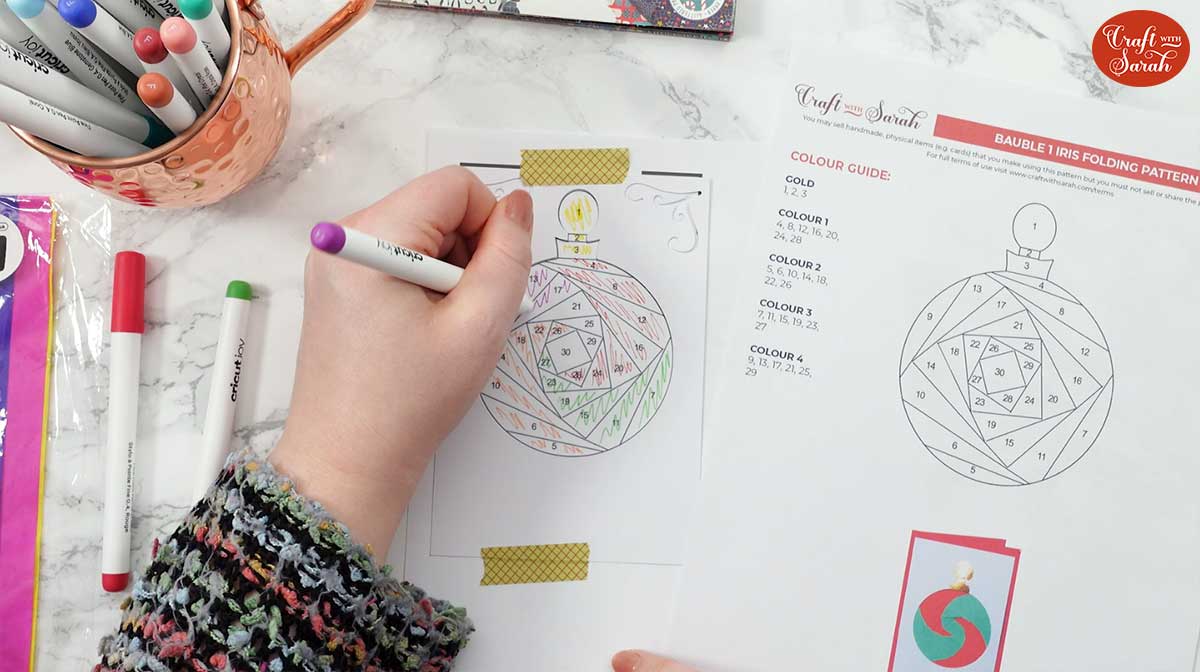
At 2 p.m. I walked down to the main lodge to participate in the adult craft for the afternoon -- Iris folding cards. When I got to the lodge, I saw the "Sip & Paint" craft (see below) that we will do later in the week.

I didn't know what to expect for the Iris Folding that was held this afternoon from 2 p.m. - 4 p.m. But I found out I really love Iris Folding!
* * * * * * * * * *
What is iris folding? Iris folding is a paper craft technique that has been around for decades! It’s thought to have originated in Holland during the 20th century when people would cut old envelopes into paper strips and then fold and stick to create a unique spiral effect, like a camera lens.
Usually, iris folding requires a template (or pattern) with lines and numbers to guide you through the process. The technique can be used to create a wide range of things such as greeting cards, home décor, handmade gifts and paper party decorations.
How can you do Iris Folding if you would like to try it? Before you start, gather the following supplies: 1 sheet of cardstock (two different colors -- one for front of card and the other for the back of card) that you will cut into 5" x 7" rectangles, Iris Folding Template, scotch tape or glue stick, masking tape or blue painters tape, scissors, pencil, ruler, craft exacto knife, cutting mat, double-sided sticky tape, and Origami paper (plain colors or patterns/designs).
1) Print out the pattern. Then cut out the pattern using scissors.

Take your white rectangle of cardstock (or whatever color you are using) and turn it over so that the back of the card is facing up. Place the iris folding pattern into the middle of the cardstock. Using a pencil, carefully draw around the edge of the pattern. Try not to move the pattern around when you are drawing, as you want to draw a smooth, accurate outline of the iris folding pattern.
2) Cut out your aperture. Place a cutting mat on your table to protect your work surface. Then use an exacto craft knife to cut out iris folding shape. Carefully cut around the pencil line you’ve just drawn with your craft knife. Or if you like, you can use scissors.

When you’re done, pop the shape out of your card and leave to one side, as we won’t be using the shape itself – we need the window cutout.

The next steps are for making iris folding cards. Once you have cut out the aperture of your pattern, it’s time to let the folding begin!
3) Secure the pattern by placing the iris folding pattern on your work surface. Use a couple of small pieces of masking tape or blue painters tape to secure the pattern to your work surface so that it doesn’t move when you complete the folding.

4) Place your cut-out on top of the pattern and line it up so that the cutout in the card matches the shape of the pattern. Use some more masking tape to secure the card. Make sure you only put a small amount on the white card, as you will be using most of the space on the back to stick your colored paper strips to.

If the pattern has multiple colors, you will be able to see a guide on the pattern printout (see below).

5) To make it easier while you are folding, you can color the segments of the pattern with pens or pencils to match the guide (see below).
6) Prepare your paper strips. Thin colored paper, Origami paper, wrapping paper or even wide florist ribbon are all great choices for iris folding strips. You need paper that’s not too thick, so avoid using card or heavy scrapbook paper.

It will not matter if your strips have jagged edges from where you have cut them out. Fold the strips in half to get a nice crisp fold. Use a bone folder or brayer to enhance the crease, but if you don’t have either of those then just make sure you run your finger all the way down the crease.

7) Place the strips around the edge of your card by positioning the colors on the sides of the pattern that you will be using them on, to make it easier to pick the right color for each fold (see below).

8) Now you’re ready to start iris folding! Then stick your paper strips down according to the numbered pattern starting with the Number 1.

Cut a strip of your paper so that it’s just longer than the fold on the pattern. Place the strip over the pattern so that the creased line sits along the straight line next to the Number 1. Use scotch tape to secure the paper strip to the white card.

Don’t worry if some of the excess goes outside the edge of the white card as it can be trimmed at the end. Do the same process for Number 2 on your pattern. Take your paper strip, cut it to size, place the creased edge along the next fold line on the iris folding pattern and then secure it to the white card with scotch tape.

Keep going along the rest of the pattern, following the folds in numerical order. You can place your scotch tape on top of paper strips you have already secured, but make sure your scotch tape doesn’t go outside the edge of the white card – you don’t want to end up accidentally sticking your card to your work surface!

9) Complete all the folds on the iris folding template. When you get to a new color on the pattern, the folding works in exactly the same way as the first color.

If your card starts to get a little bulky with all the paper strips, use a longer piece of tape to help stick the strips down a little bit flatter. Don’t be tempted to turn your card over and take a sneaky look at the front before you have finished as it’s really hard to line everything up exactly if you move it during folding. That is why you use making tape at the beginning to keep the white card in position. Keep going along all of the folds until you are left with just the square in the middle of the pattern.

10) Cover the iris folding square. Traditionally, the square of the pattern is covered with holographic or metallic paper so that it looks like the shiny iris in the middle of a camera lens.

But if you don’t like the metallic effect because then the middle doesn’t match the rest of the design, then simply tie in the middle square to match the whole card. To do this, choose one of your paper strip colors and place it diagonally across the square to leave behind a triangle of empty space.

Choose the color from the opposite side of the pattern and stick a piece of it over the remaining gap.
11) Reduce bulk and trim off excess paper strips. Now is the fun part where you can turn the card over and have a look!

If you’ve got paper strips sticking out from the edge of the white card, trim them off with a pair of scissors. You could use a craft knife and metal rule to get straight edges, but scissors work just fine.

Use some long pieces of sticky tape and go down all the edges of the white card. This helps to make sure your paper strips are all secured to the white card, and also reduces bulk. Turn your card over, and if you have any parts where the paper strips are coming away from the card then stick another long piece of sticky tape down the edge to secure them.
If the pattern is bulky from thick paper strips, press it under a couple of heavy books or similar overnight to help thin it out.
12) Stick your iris folding topper to your card front. Take your double-sided sticky tape and place a strip down each of the edges of the back of your card. Try to get the double-sided tape as close to the edges as you can. You may want to put a piece down the middle of the card as well, for that extra bit of stickiness.

Firmly stick your iris folding design to the colored rectangle of card. Press down all over the card to make sure it’s really stuck down.

13) Stick the iris folding design to your card blank using glue or foam squares.

Embellish with toppers, flowers, sentiments or… whatever you like! Or, leave it plain – it’s completely up to you.

And there you have it – your handmade iris folding card is all finished!
* * * * * * * * * *
Below are several of the Iris Folding cards I made:


Below are some of the samples the instructor made:


Friday, March 15, 2024
Today was another beautiful day, so while Mel was playing pickleball, I went for a 37 minute, 4.9 mile bike ride around the campground (see screenshots below).


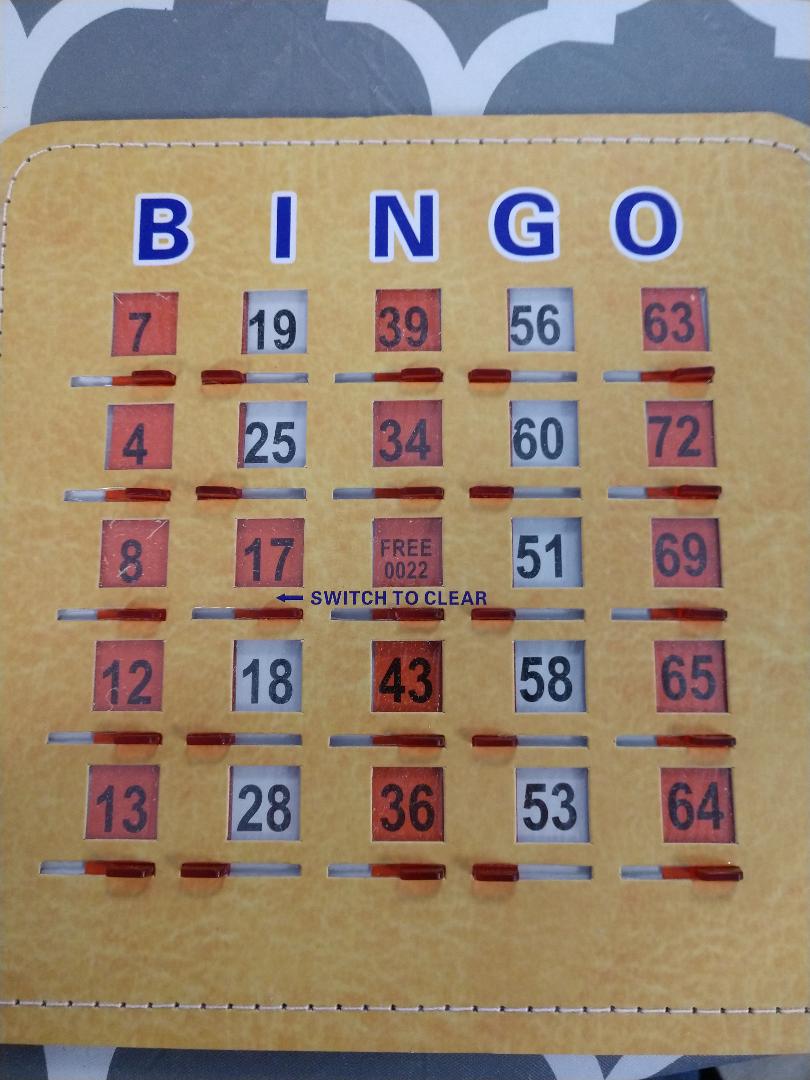
Then from 1:00 p.m. to 2:00 p.m., Mel and I went up to the Recreation Hall and played candy bar bingo -- BINGO, only with a twist! You win candy bars for a bingo and what could be better than that? Everyone playing Bingo today was allowed three cards and each person could only win a total of three candy bars.

Shown above are the three bingo cards that Mel picked to play bingo, while below is the three cards that I picked out.


Shown above is the activity director and her bingo machine.

We played many games of bingo, however the first game we played was a straight bingo (meaning you could have a bingo along a horizontal line, or vertical line, or diagonal line, or by having all 4 corners covered).

Lucky me -- I had the first bingo straight done the center of the card (see above) and won the butterfinger candy bar (shown below).

We continued playing (didn't clear) with the same cards for a double bingo. Mel got that with one of his cards (see below), and won a candy bar.

The bingo caller had us continue on again with our cards (not clearing them) and we played until we had the letter X on our cards.

It must be my lucky day for bingo, as I was the winner of the letter X bingo game (see above). This time I won peanut M&M's (see below)!

We played several bingo games before Mel or I won again. Then the next bingo game we played we had to spell "Hi" on our card. And like I said earlier -- this must be my lucky day (see my "Hi" bingo below).
That was the last bingo that I could win today -- number three -- so I selected a Baby Ruth candy bar as my prize (see below).

Shown below is my bounty for the three times that I won playing Candy Bar Bingo today!

We cleared our cards, and the next bingo we were playing for the letter T -- for Thousand Trails. And this time the luck shifted to Mel (see his winning bingo card below).

So all in all, Mel and I walked away with a total of 5 candy bars today at Candy Bar Bingo. Yummy!
Saturday, March 16, 2024
It was another beautiful day, so while Mel played pickleball, I went for a 50 minute, 7.2 mile bike ride around the campground (see the screenshot below).

Sunday, March 17, 2024
Happy St. Patrick's Day!

St. Patrick’s Day is celebrated annually on March 17, the anniversary of the death of St. Patrick, the patron saint of Ireland, in the fifth century. The Irish have observed this day as a religious holiday for over 1,000 years. On St. Patrick’s Day, which falls during the Christian season of Lent, Irish families traditionally attend church in the morning and celebrate in the afternoon. Lenten prohibitions against the consumption of meat were waived and people would dance, drink and feast on the traditional meal of Irish bacon and cabbage.
St. Patrick was the patron saint of Ireland, who was brought to the Emerald Isle where he was kidnapped and enslaved. Though he eventually escaped, he returned and advanced Christianity throughout the island.

Saint Patrick, who was born in Roman Britain was kidnapped and brought to Ireland as a slave at 16. He later escaped, but returned to Ireland and was credited with bringing Christianity to its people.
_-_stained_glass,_Saint_Patrick_-_detail.jpg)
The holiday was originally started in 1631 by the Catholic Church as a Feast Day honoring St. Patrick. However, the holiday imported to the U.S. by Irish immigrants was morphed into a show of Irish-American pride and worldwide celebration of Irish culture.

So I wish my family and friends all a Happy St. Patricks Day -- and don't forget to wear green or you will get pinched for sure!

The history of getting pinched for not wearing green goes back a ways. It's been common for people to wear green on St. Patrick's Day because of the holiday's association with Ireland's nickname -- the "Emerald Isle"-- and its flag's colors. In addition, people wear green on this occasion since shamrocks are commonly associated with this holiday.
However, according to fun folklore, you will get pinched on St. Patrick's Day if you are not wearing green -- mainly because green makes you invisible to leprechauns. Leprechauns are known to be mischievous creatures, and according to legend, they like to pinch people just because they can!

Today I went for a 36 minute, 4.6 mile bike ride, while Mel played pickleball (see picture below of the pickleball court). The children in the Palm Springs Thousand Trails Campground searched for hidden pots of gold.

Fat Boy Tacos And Catering came to the Palm Springs Thousand Trails campground tonight. It is a local catering company in Palm Desert, California that specializes in providing delicious, homemade Mexican cuisine. They pride themselves on using fresh, locally sourced ingredients to create their mouthwatering street tacos and a variety of other dishes (see the food truck below).


Mel had the FatBoy Taco -- which is their signature taco that comes with a green corn tortilla made with cactus, cheese shell inside (mixture of cheeses) all 3 meats (grilled steak, grilled chicken, marinated pork) with fresh pineapple slices, cilantro, onion, salsa, and guacamole (see below).

I had the five street tacos (a couple grilled steak, a couple grilled chicken, and one marinated pork). See below for a picture of my five delicious street tacos.

And tonight from 5:00 p.m. to 8:00 p.m., we listened to Glen Smith sing and play guitar in the Recreation Hall at Palm Springs Thousand Trails.

Glenn performed as a one man show and had such a diverse variety of songs -- that he could sing and play almost anything from Johnny Cash or Marvin Gaye or Bon Jovi and then switch to classic rock, folk rock, reggae, bluegrass, hard rock, country, and classical. He also had a few original songs that were an eclectic blend of his love of these styles. With such a wide variety of songs in his musical arsenal, he has been often called “the human jukebox”.

A key component is his wonderful ability to relate to all audiences and make them a part of the experience. With his expansive vocal range as well as being an accomplished guitarist with the ability to bring people together through music, he really is the complete picture of an entertainer. Glenn can also play a guitar piece using an incredible tapping technique and have the whole room full of people clapping along with him. We truly enjoyed hearing him!


And while we were up at the Recreation Hall enjoying lovely music, I spotted another beautiful sunset among the palm trees (see below).

What a marvelous ending to a beautiful day!
Shirley & Mel


Fantastic! I loved all the crafts and bingo. The snow covered mountain is just beautiful to see off in the distance. Yall look great. Send us more postings when you can.
ReplyDelete