Monday, June 26, 2023
We woke up this morning to a cloudy sky with rain sprinkles and a temperature of 53 degrees. It would warm up to 62 degrees. We're heading back to Palmer, Alaska for a couple of days.
And of course we hit the road construction area again.
And on our way to Palmer, we drive by the outskirts of Anchorage again.
It begins to rain as we get closer to the Eagle River area.
And soon we are only 13 miles from Palmer.
Heading north on Alaska Highway 1, we soon arrive at Palmer.
And shortly thereafter at around 11:30 a.m., we arrive at the Matanuska River Park Campground. It is located near the Matanuska River Bridge just on the eastern edge of Palmer. The campground features just over one and a half miles of easy trails with exquisite views of Lazy Mountain and the Matanuska River.
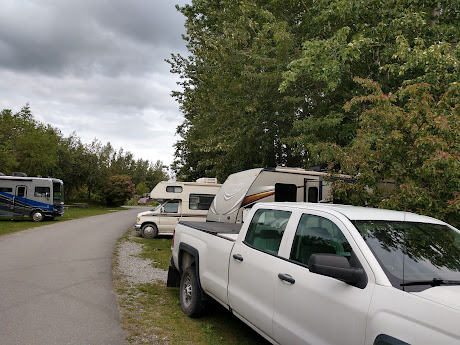
Our campsite at Matanuska River Park Campground in Palmer (site# 33) is a little tight, but we get all set up for the next two days. It cost us $30/night.
At 12:10 p.m., we take off to run some errands with our first stop at O'Reilly Auto Parts. Our nest stop is at Wal-Mart in Wasilla to get groceries. While in Wal-Mart I spot this neat soda display of an eagle (see below).
We then make a quick stop at Sylvia's Quilt Depot located a short distance from the Wal-Mart in Wasilla. I went in to pick up the 2023 row-by-row pattern. Then we headed back to our camper to put away the groceries. At 2:30 p.m., we went to Matanuska Brewery for a late lunch/early dinner.
Mel had a spicy hamburger with fries and a beer (see above), while I had a French dip sandwich and fries (see below). Their pub food is so delicious and Mel loves the beer too!
After we were finished eating, Mel bought his "to go" beer (they give you a good discount if you eat there), and then we stopped briefly at the community garden so Mel could pick some fresh rhubarb.
We then stopped at Fred Meyer for a propane fill. We got back to the campground around 4:30 p.m.
Tuesday, June 27, 2023
This morning was a beautifully sunny day starting out at 55 degrees, but nevertheless a absolutely perfect day to go along Hatcher Pass to the Independence Mine State Historical Park. (The last time we were in Palmer and we had tried to go to the mine site, there had been so much snow on the ground -- and it had even snowed while we were driving to the mine that they had closed the road.) Today it was totally different!
At 9:45 a.m., after a breakfast of a bagel topped with a fried egg, bacon and cheese, we took off from the Matanuska River Park. We first stopped at the "Just Sew Quilt Shop" in Palmer so I could pick up the 2023 row-by-row pattern.

At milepost 49, there was a junction with Palmer-Fishhook Road, which led north to Hatcher Pass Road. We made a brief stop on our way to get gas at the Tesoro Gas Station. And then we continued on toward the Independence Mine State Historical Park.
We were now only about a mile from the mine site and are beginning to see a few buildings. We see piles of snow yet in the area.
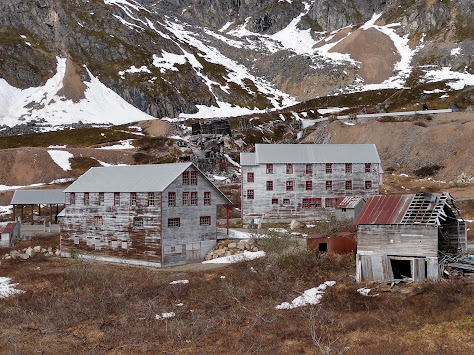
Hatcher Pass is 3,465 feet above sea level and features the Independence Mine State Historical Park. Independence Mine started in 1906, with the mines having ten miles of tunnels. Millions of dollars in gold was extracted here. Miners lived and worked in the buildings until they were abandoned in 1951.
When we arrived at the parking lot this time, there wasn't the enormous piles of snow in the closest lot as we had seen last time. We parked the truck and paid the $5 parking fee and were on our way to explore the Independence Mine State Historical Park.
We began our self-guided tour by walking around the different buildings and sites and reading the interpretive story boards. From the Manager's House (The Big House), we followed the Hardrock Trail past other restored buildings at the Independence Mine site.
The interpretive signs described the remaining historic mine buildings, including mess halls, bunkhouses and the partially collapsed mill and equipment we passed on the way. The three buildings open that we could walk through were the Manager's House, Bunkhouse No. 2, and the Assay Office.
Mel climbed the trail all the way up to the water tunnel portal, where cool, damp air poured out of the mountain (since the trail was really steep and still covered in snow in some areas, I chose to spend more time in the Assay Office).
The above story board told about all the hiking opportunities in Hatcher Pass, while the next two story boards told about the Independence Mine State Historical Park and provided a map of the site.
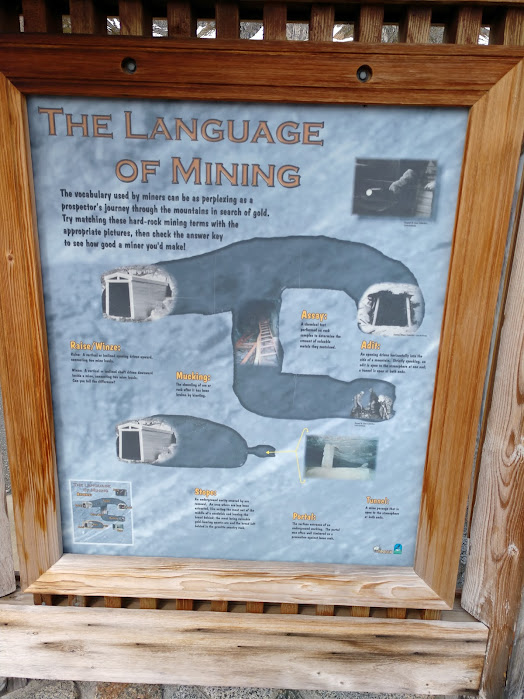
The next story board provided us with some of the vocabulary used by the miners -- such as "mucking," which means the shoveling of ore or rock after it has been broken by blasting.
This story board told us about the gold deposits and the two methods used to mine them -- placer and hard rock.
The next story board told about how management accommodated married men and allowed them to build and own houses on company mine claims. This area became known as "Boomtown" or "Independence Village."
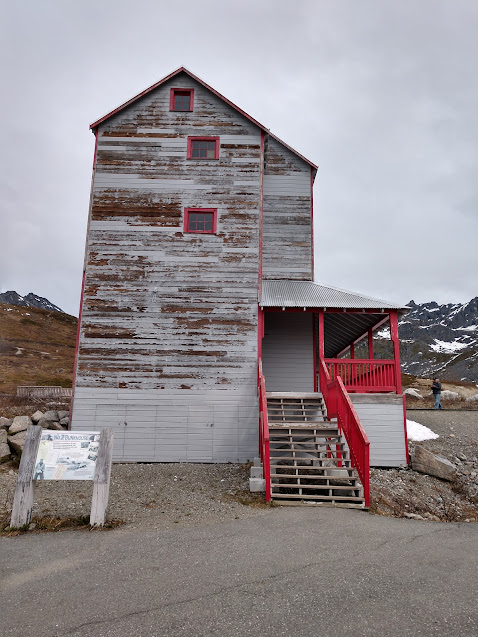
The above story board talks about "The Big House," which was first built for the general manager, Walter W. Stoll and his family in 1939. The manager's house was meant to be distinctive. It was located apart from the rest of the camp and was painted tan instead of aluminum. Its roof was was red using ribbed metal instead of galvanized corrugated metal. Designed by "Big Walt's" eldest son Walter C. Stoll, it contained many modern conveniences -- such as hot water, a refrigerator, an electric range, and a washing machine.
The following pictures are from inside "The Big House," or manager's house shown above.
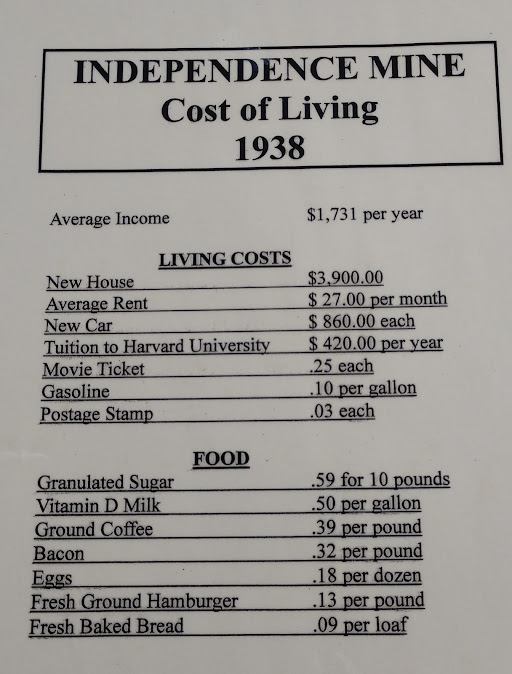
Check out the cost of living during 1938 -- for example a new house cost $3,900.
Above and below are many of wildflowers and wild berries that grow in Alaska.
Below is the huge fireplace in "The Big House," that was built of rocks from a nearby mine.
Above is a picture of the Stoll family that is above the piano in "The Big House." The family includes Walter W. Stoll and his wife, Louise, and sons, Walter C. and William M. and daughter, Sylvia. Also in the picture are Josette Stoll, wife of William M. Stoll and cousin, Dick Montgomery.
The above story board talks about the power of gold and its effect. While below we learn that the Independence Mine was the most productive hard rock gold mine in Southcentral Alaska during the late 1930s and early 1940s.
For hard rock mining, they have to drill, blast and muck to get the gold.
Gold was definitely a seductive mistress -- who literally lured thousands of people to Alaska's wilderness to seek their fortune during the late 19th and early 20th centuries.
Above is the view of the rest of the park through one of the windows in "The Big House."
And it truly was an awesome view -- with panoramic views of the surrounding Talkeetna Mountains!
Above is the tool and timber shoot located in "The Big House."
Below, Mel is walking to Bunkhouse No. 2. During the late 1930s and early 1940s, as the Independence Mine prospered, the mining camp was expanded. This bunkhouse was built in 1940 to house an additional 50 men on the upper two floors. The first floor had a drying room for wet work clothes, a washroom, first-aid room and movie theater.
Below are a couple interpretive signs inside Bunkhouse No. 2.
The interpretive sign (above) told of how the Independence Mine site went from a Boomtown to a ghost town. At its peak, the entire Independence camp included approximately 27 buildings. The area's weather, including dampness and prolonged heavy snow load, weakened many of the buildings that they eventually collapsed.
The interpretive sign (below) told the story of Gold -- which really began approximately 75 million years ago, as large mass of molten rock several miles thick that started to cool below the earth's surface.
Some of the equipment found in Bunkhouse No. 2 is shown below.
The interpretive sign below tells about the need for muckers to shovel and lift rocks 8 hours/day, 7 days a week, all year round. This damp, dark and dangerous working condition only paid $7.50/day plus board.
In one shift a mucker could fill 20 one-ton cars with rock, destined for either the mill if it contained enough ore, or a tailing pile if it was waste rock. The ore, which averaged one ounce of gold in each ton, was carried to the mill by aerial tram or rail cart.
The interpretive sign below tells about the water tunnel portal which was one of several entrances into the Independence Mine, but the water tunnel portal became the most important thing to the overall functioning of the operation. The tunnel streamlined the transportation of ore, increasing both production and efficiency.
The interpretive sign below talks about the power plant that was built in 1937. Its location on the hillside took advantage of gravity to reduce power consumption and move ore through the mill.
Below is a neat cribbage board that I found while looking in the gift shop in the Bunkhouse No. 2.
Below, the interpretive sign provides information on Bunkhouse No. 2 and its layout -- it had two upper flours with ten, two-person bedrooms. Bachelor apartments were built for the engineering staff at the end of the upper floor hallways. Designed for four or five men, they consisted of two bedrooms, a sitting room and private bathroom.
Below is a side view of Bunkhouse No. 2.
Next we saw the Framing Shop -- which is where timber frames for supporting the underground workings in the mine were cut, as were the heavy timbers needed for camp construction projects (see interpretive sign below and the next couple pictures).
Next we came to Bunkhouse No. 1. Built in 1938, this was the first "real" bunkhouse at the Independence camp. It was heated, plumbed and had electricity. This bunkhouse housed 54 men. It was considered the best accommodations among the 38 mines and prospects in the Willow Creek Mining District.
Views of Bunkhouse No. 1 are shown below.
Next we saw the Engineering Office and Warehouse. The Engineering Office was equipped with drafting table, calculators, a map duplicating machine, and engineering tools. This was the finest facility of its kind in the Willow Creek Mining District. Adjacent to the Engineering Office, the Warehouse portion of the building provided dry storage for hardware, canned goods, dry foods and various equipment. On the second and third floors were bunkrooms and for a short time, a room on the second floor was a territorial school.
Above and below is the Engineering Office and Warehouse.
The interpretive sign below describes the school that was located on the second floor of the Engineering Office and Warehouse -- in particular a territorial school. To respect sleeping miners, the students were not allowed to sing or play musical instruments in class, or play in the vicinity of the building.
Above is the interpretive sign about the Mine Office and Commissary. This was the last of three building completed during the construction season of 1937. Daily decisions regarding operations, payroll, purchasing, shipping, and receiving were made in the Mine Office. This building also housed the camp commissary, the original engineering office, and the post office.
Above is the Mine Office and Commissary, while below is the interpretive sign about the Apartment House.
In July 1937, the Apartment House was one of the first buildings constructed on site, beginning the transformation from a tent camp into a permanent year-round camp. It had four identical apartments that were the living quarters for married supervisors and their families. Each of the four identical units had a combination living/sleeping room, a kitchen, and a full bathroom on the first floor. Each kitchen was equipped with a cooking stove and refrigerator. (See the Apartment House below.)
Ruins of the original cookhouse are below.
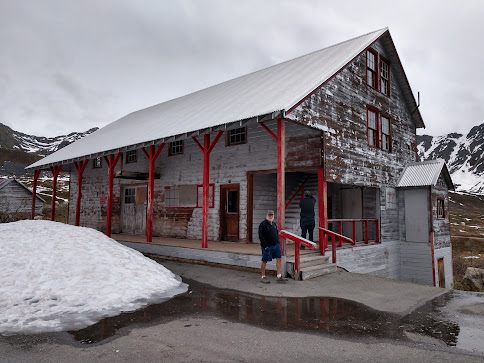
The interpretive sign on the "New" Cookhouse and Mess Hall is above. As mining operations expanded at the Independence camp, population increased. In 1941, this larger Cookhouse replaced the original one. The second floor had two supervisors' apartments and quarters for the kitchen help.
The new Cookhouse and Mess Hall included a fully equipped kitchen, bakery, butcher shop, refrigerated cold storage, dry storage rooms, a dishwashing machine, and a 20-table dining room that could seat 160 men. The basement storage bins could hold 10 tons of potatoes. The second floor had a cook's apartment, quarters for the kitchen helpers or "flunkies" and two comfortable, three-room supervisor's apartments.
Above and below is the "New" Cookhouse and Mess Hall.
Next we came upon the "Mill Loop Trail." This quarter-mile trail traveled around the mill and ended near the water tunnel. The trail was steep in some areas.
Below are pictures of the Original Cookhouse and Bunkhouse ruins and the interpretive sign describing them.
The covered shelter and the timbers on the ground (shown above) are the ruins of the original two-story Cookhouse and Bunkhouse. The first floor of the Cookhouse and Bunkhouse had a kitchen, storeroom, cook's living quarters and a dining room with seating for 48. The one room sleeping quarters upstairs had 26 iron-spring cots and mattresses. Attached to the main building were a washroom with showers and a drying room for miners to hang work clothing, wet from the constant dripping of water underground.
Below is the interpretive sign on how ounces of gold from the mountain of rock are extracted.
Mel continued on the Hard Rock Trail -- I didn't because some of it was steep and still covered in snow.
Mel said the highpoint of the Hard Rock Trail was literally climbing the trail to the water tunnel portal, where there he had a great view of the entire complex and could feel a blast of cold air pouring out of the mountain.
The views of the entire Independence Mine camp were magnificent!
Above and below are views into the water tunnel at Independence Mine.
The interpretive sign on the water tunnel is below. Before the completion of the water tunnel, they removed the gold-bearing quartz ore from the mountain through the portals at the 900 foot level and transported it by aerial tram to the mill. There are between 8-10 miles of tunnels in the Independence Mine. The Water Tunnel is an extension of an old adit that a stream of water flowed from year-round.
Below is the interpretive sign about the Mine Train. The Mine Train was first used in 1940 before implementing the Water Tunnel. The train helped the men move equipment and improved the speed of ore removal. Two battery powered locomotives moved the ore and flat cars. They also used a mucking machine. Both of these were on display.
The remains of the Mine Train are above and below.
While Mel was up exploring the Water Tunnel and Mine Train, I went on to see the Assay Office.
An interpretive sign about the Pipe, Sheet Metal and Electric Shops is shown above. (The remains of these building are below.) At one time these elaborately equipped shops had all the necessary tools and materials needed to handle fabrication and repairs.
An interpretive sign about the Powerhouse is shown above, while the remains of the Powerhouse is below. Inside the Powerhouse were several diesel generators producing power for the mine, mill, and camp.
An interpretive sign on the Ore Sorting Plant is shown above, while the remains of the Ore Sorting Plant is below.
Ore from the mine was transported by aerial tram or train to the Course-Ore Storage Bin to be stockpiled. Ore was then conveyed to the Ore Sorting Plant where barren waste rock was discarded and the valuable gold-bearing quartz was screened, washed, and crushed. The gold-bearing ore was sent to the ball mills for reduction. Pulverized rock exited the ball mills in the form of a "slurry" flowing onto amalgamation plates that trapped the gold. Fine particles of gold not recovered by milling and amalgamation continued on to the floatation cells for further processing.
An interpretive sign on the Assay Office is shown above, while a picture of the Assay Office is below. Two critical jobs were performed in the Assay Office: daily testing of ore samples and retorting. Today, the Assay Office houses a museum with displays explaining the assaying process and various mining techniques.
Before stepping into the Assay Office, I stopped to take a few more pictures of the ruins and the water flowing through it (see below).
As I walked into the Assay Office, there were several rooms, each identified with its purpose.
The first room was the Retort Room (see information above) and a picture of the Retort Room below. The retorting process took place about once every week. The heating process or retorting separated the mercury from the gold by distillations. Amalgam cakes were crushed and squeezed into a cast iron retort pot. the resulting in a 50% gold and 50% mercury. In the amalgam, they punched small holes to form gas vents. This allowed the amalgam to heat more evenly and more rapidly.
The next room was the Furnace Room (see information above) and a picture of the Furnace Room below. At the end of the process, the retort pot was removed from the furnace and allowed to cool. Interestingly, the mercury which had been recovered later was weighed and returned to the mill for reuse in the milling operation. The remaining "sponge" was nearly solid gold. The assayer's office also contained the chemicals, delicate balance scales and other equipment used to determine the gold content of the ore.
The next room was the Balance Room (see information above) and a picture of the Balance Room below. The Balance Room contained a Heusser Gold Balance on a platform. The balance was used to weigh the pure gold buttons. Extreme care was taken to insure accurate weight, as the balance was literally sensitive to the weight of a feather.
The next room was the Bucking Room (see information above) and a picture of the Bucking Room below. Samples were taken from the various stages in the mining and milling operation and tested for their gold content:
* Mine Samples - taken from underground whenever necessary to determine the value of the vein.
* Waste Rock - taken from the sorting belt was sampled daily to determine how much gold was accidentally discarded.
* Mill Samples - taken every half hour to measure the amount of gold in the ore.
* Tailings - sampled every half hour to determine the amount of gold that had been missed in processing.
The samples were brought to the Bucking Room where they were dried overnight in an oil-fired bake oven. The assayer would crush the dried samples and put them through a pulverizer, reducing them to a fine powder. Once they had been crushed, the samples were taken to the furnace room for firing.
Shirley and Mel in front of the ruins at Independence Mine State Historical Park.
After we had seen everything we wanted to see at the Independence Mine State Historical Park, we drove out and followed the primitive road back a different way.
The primitive road went on for the next 20 miles.
We drove past the Summit Lake Recreation Site.
As we drove along, the snow appeared to be getting a little deeper.
We finally reached the Hatcher Pass Summit, which was 3,886 feet above sea level.
Someone had made a little snowman in the drift of snow at the Hatcher Pass Summit (see above).
As it was starting to rain again, we continued on our way.
We came to a spot in the road where we had to wait for the road grater to pass by us before we could continue on. I was glad to see that they are constantly doing road maintenance however.
We finally got to the end of the dirt/gravel road and back on the main highway. Yeah!
We stopped at the Three Bears Gas Station in Houston, Alaska so Mel got get some beer. Then when we got back to Wasilla, Alaska, we got a late lunch/early dinner at the Taco Bell (we each had a cravings box).
After that we stopped at the Super Suds Car Wash in Palmer to wash the truck after all the muddy roads we had been on. Next we stopped at the Fred Meyer in Palmer to get a few groceries. And then, we stopped at the Arkose Brewery in Palmer, where Mel had a flight of beer.
And then we made one final stop at Fred Meyer to get gas before going back to our campsite at Matanuska River Park.
What a fantastic "mind-blowing" experience we had at the Independence Mine State Historical Park today!
Shirley & Mel














No comments:
Post a Comment